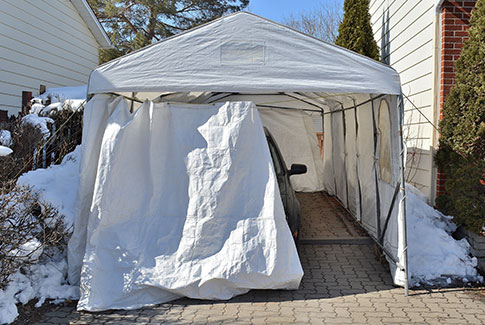
Buying, renting, installing, and maintaining a car shelter

Are you thinking about renting or buying a car shelter? Here are some tips on choosing the right shelter and installing it properly so it won’t get blown onto your neighbour’s property by a gust of wind or collapse on top of your car.
Things to consider when buying or renting a temporary shelter
Car shelters must be made using quality materials for durability and safety. Choose a shelter for which you can easily source replacement parts, particularly the tarp and structural tubes.
Metal structure
A frame that is rounded or has a steep slope is generally less prone to snow accumulation and will be easier to clear of snow, provided the tarp is properly tensioned. What you need to know:
- Canadian galvanized-steel pipes have a good reputation for sturdiness and corrosion resistance.
- A quality frame should consist of 0.16-gauge metal tubing, and preferably with a diameter of 1 1/4 inches to 1 5/8 inches in diameter. The tubes’ slip-fit connections should extend over about 3 inches.
- Gaps between arches can vary slightly, from 48 inches to 52 inches. A good frame kit also includes bracing tubes designed to reinforce these arches.
The tarp
When properly installed, taut, and well maintained, a tarp has a life expectancy of about five years, as long as it’s coated on both sides to ensure it remains watertight and to protect it against ultraviolet rays. (Sunlight is one of a tarp’s worst enemies.) What you need to know:
- Tarps for residential car shelters are made of woven polyethylene fiber. They are available in various colours: clear, opaque, forest green, grey, and beige.
- For the best quality, choose a tarp with a weave count of 10 x 10 per square inch with a strength of 1,600 denier. Manufacturers often refer to the quality index:
- 5.65 oz / sq. yd. for residential use
- 7.33 to 12 oz / sq. yd. for commercial or industrial use
- Tarps with heat-sealed seams last longer and are more watertight. If you choose a tarp with sewn seams, polyester/cotton thread offers the dual benefit of strength and water resistance.
- The windows are usually made of transparent PVC film (such as Vuflex) that offer protection from UV rays and cracking in cold weather. However, PVC film is somewhat fragile and can be damaged by extreme cold.
- Standard shelters usually feature front and rear doors with elastic closures. Front-door-only shelters are also available.
Don’t know which shelter to choose? CAA-Quebec’s Advisory Services can give you objective advice.
Should I buy a used shelter?
If you want to buy a used shelter, look it over carefully. Here’s what you need to check to make sure it’s in good condition. Remember, your safety is at stake:
- Are the components sturdy? Are any of them bent out of shape?
- Are the tubes rusted?
- Are all fasteners and hardware included and usable?
If the answers to these questions aren’t good enough, don’t buy the shelter.
When should I assemble my car shelter?
Check with your municipality about existing regulations regarding installation dates (usually from mid-November to the end of March, longer if the weather justifies it), recommended materials (especially for homemade shelters), and minimum distance from public roadways (e.g., sidewalk, street).
Temporary shelter assembly tips
Along with maintenance and storage, proper assembly can help your car shelter last longer. Ideally, you’ll need two or three people to properly assemble the shelter. If possible, choose a day with no wind or precipitation.
- Assemble the shelter at least 1.2 metres away from buildings to prevent windblown snow or snow falling off a roof from accumulating in the gap (unless you opted for a shelter that is meant to be installed beside a wall).
- Connect the tubes to one another (consult the manufacturer’s assembly manual) and bolt them together until the structure can stand on its own.
- Attach the metal shelter frame to the ground using an anchoring system:
- Temporary anchoring—place anchor rods in an inverted V at least 12 inches to 20 inches deep in the parking surface.
- Permanent anchoring—use anchor rods secured using grab hooks or Permafix-type toggle bolt anchors. This makes it easier to assemble the shelter each year. Once buried in the ground, they are fixed under the asphalt, concrete, or pavers. You can attach the shelter to hooks that you fasten to the above-ground parts of the rods. In summertime, you can replace the rings with screw seals. Their rounded heads are the only part that sticks out of the ground.
Improper tension can cause tears in the tarp. Insufficient tension causes the tarp to sag and retain water or snow, while too much tension makes it subject to tearing from friction against the metal frame in windy conditions.
- Never place pieces of wood, vinyl siding or other materials between the tarp and the frame. Doing so places excess weight on the shelter and can weaken seams, cause premature tarp wear, and damage the frame.
- Never leave a vehicle with its engine running inside the shelter.
- Periodically inspect the bolts connecting the metal tubes and tighten them as required.
Safely clearing snow from and storing your car shelter
An accumulation of snow can cause the shelter to collapse and trap people inside. Don’t allow snow to accumulate on your car shelter and ensure you never make snow fall on it if you clear snow from your home’s roof.
- Clear snow from the roof using a broom or a roof rake. Heavy accumulations of snow should be removed by working in sections on either side of the shelter, one at a time, so that the structure does not become unstable or collapse.
- Periodically inspect the bolts connecting the metal tubes and tighten them if necessary.
- In springtime, remove the tarp, rub the fabric gently with a mild soap, rinse, and allow it to dry thoroughly before storing in a dry place.
Check out our seasonal maintenance guide for other home tips and tricks.

Benefit from personalized advice
Do you have questions about your home, need specific information, or are you looking for referrals to find an Approved Supplier?