Resin coatings for a concrete garage floor: your options

Resin is an excellent choice for protecting the concrete floors in your garage or inside your home and keeping them looking their best. What product should I choose? What are the advantages? How do I get the job done right? We answer all your questions.
What is resin?
Pure resins were initially used in the industrial sector. When mixed with hardeners they form a coating that’s aesthetically pleasing, durable, and waterproof. Garage flooring specialists recommend them to protect concrete floors against water, wear, impacts, etc.
What are the advantages of resin for garage floors?
Thermosetting resins have a number of qualities:
- They’re durable. When properly applied, they will last for a good 30 years, plus they come with up to 20-year warrantees.
- They don’t chip.
- They’re easy to maintain. Their density prevents dirt from penetrating.
- They can tolerate the high temperatures of hot tires and are resistant to wear, salt, and chemicals such as motor oil, gas, and antifreeze.
- Resins don’t contain solvents or emit harmful odours like VOCs (volatile organic compounds).
Epoxy vs. polyaspartic floor coatings
Epoxy and polyaspartic coatings are the two main types of resin used for concrete garage floors.
There are differences between the two products:
- Dry time – Polyaspartic resin dries much faster than epoxy. But the tighter application timeframe increases the risk of error. The upside is that you can move back into your garage very quickly after the product has been applied, and even park your car the next day. Epoxy, on the other hand, means staying off the floor for three to five days.
- Price – Epoxy is more affordable.
- Application temperature – Some epoxies cannot be applied below 10°C, but polyaspartic coatings can be applied at temperatures as low as -7°C, so you can refinish your garage floor at any time of year!
- Resistance to some chemicals (e.g., battery acid) – Although they are highly resistant to stains and chemicals, polyaspartic coatings do not handle battery acid as well as epoxy. Epoxy is therefore better suited to auto repair activities.
- UV resistance – Unlike epoxy, polyaspartic coatings do not yellow, so they can be used indoors, outdoors, and even on balconies.
- Flexibility – Polyaspartic resin comes out on top here too. Because it can withstand slight movements, it is particularly well suited to cracked concrete surfaces.
- Anti-slip finish – Epoxy-covered surfaces are less slippery than ones covered with polyaspartic resin. Vinyl flakes or other anti-slip particles are added to polyaspartic resin to address this problem.
Can I finish my floor with resin myself?
Resin coatings are available from some retailers, allowing you to save hundreds of dollars on installation. But a word to the wise: If you plan to do the whole job yourself, be sure to properly clean the concrete surface. And if you don’t hire a professional, the product warranty will be valid for one year only.
Preparing concrete floors for resin application
Preparing the concrete slab is very important for the coating’s longevity. Any good resin applicator (pro or otherwise) should follow these steps:
- Make sure the concrete slab is not excessively moist. If it is, dry it first.
- Clean the floor with a degreaser to remove any grease stains.
- Sand it with a diamond grinder to make sure the coating adheres well.
- Fill existing cracks.
- Remove all dust and clean the slab in preparation for the next steps.
At this stage, methods of application vary depending on the type of coating. The application method for polyaspartic coatings is listed below.
Applying polyaspartic floor coatings
Polyaspartic coatings cure in under 30 minutes, so ideally two or more experienced workers are required to apply the coating in the prescribed timeframe. Follow these steps:
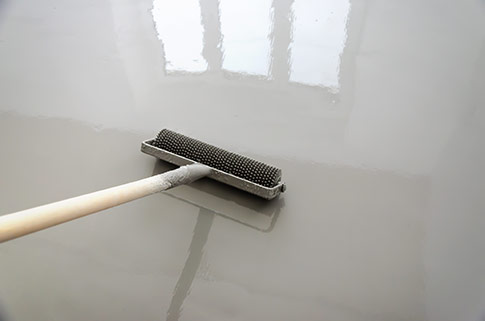
- If the slab is very porous or damaged, an epoxy primer may be required. If not, apply the polyaspartic base coat. Use a rubber squeegee to apply a coat of resin and smooth it out with a roller.
- Spread vinyl flakes over the surface. The flakes are both decorative and practical: They mask imperfections in the slab and create a non-slip finish.
- Let the coating cure for an hour or two and then remove the excess flakes with a vacuum or blower.
- To complete the job, apply a clear polyaspartic finishing coat, which seals in the vinyl flakes and creates a non-slip, washable surface. Aluminum powder can be applied at this stage to create a non-stick floor if vinyl flakes were not added previously. You can move back into the garage for the long term after only a few hours!
Paint: An affordable solution for your garage floor
If you’re looking for a more affordable (if less permanent) solution for finishing your concrete garage floor, think good old paint. Concrete floor paints are sold at hardware stores. Most are water-based epoxy or polyurethane blends.
Water-based products have a low VOC content and are considered environmentally friendly. But there’s one drawback: After the diluent has evaporated, the remaining solids form a less even and less durable coating than industrial products.

Benefit from personalized advice
Do you have questions about your home, need specific information, or are you looking for referrals to find an Approved Supplier?